

How to Fix the WordPress Not Sending Emails Issue
A very common issue we see among website owners is WordPress not sending emails correctly or at all. Most managed WordPress hosting providers, , don’t provide email hosting. However, that doesn’t mean you can’t send emails. Typically when you are trying to fix the WordPress not sending emails issue it is not a problem on the server, but rather email is setup incorrectly on the WordPress installation or there is an incompatibility.
Follow the steps below to get email up and running on your WordPress site. This should be applicable for almost any WordPress hosting provider, as well as WooCommerce not sending emails.
Fix WordPress Not Sending Emails
Typical scenarios of WordPress not sending emails might include a submission to a contact form that you never receive, or a third-party plugin notification. This could also apply to WooCommerce not sending emails from recent sales or customer inquiries. Typically these issues are caused by incorrect settings in plugins or incompatibility with HHVM, PHP 7, etc. Below are some quick solutions to get you up and running fast.
Test Email On Your Server
The first thing you can do is run a test on your WordPress site with the free Check Email plugin. This is a very basic plugin designed to simply test if your WordPress installation and or server can send emails. As of writing this, the plugin has over 40,000 active installs with a 4.9 out of 5-star rating. Once installed, simply click into “Check Email” under the tools menu in your WordPress dashboard. Enter in an email address to send a test to, and click on “Send test email.”
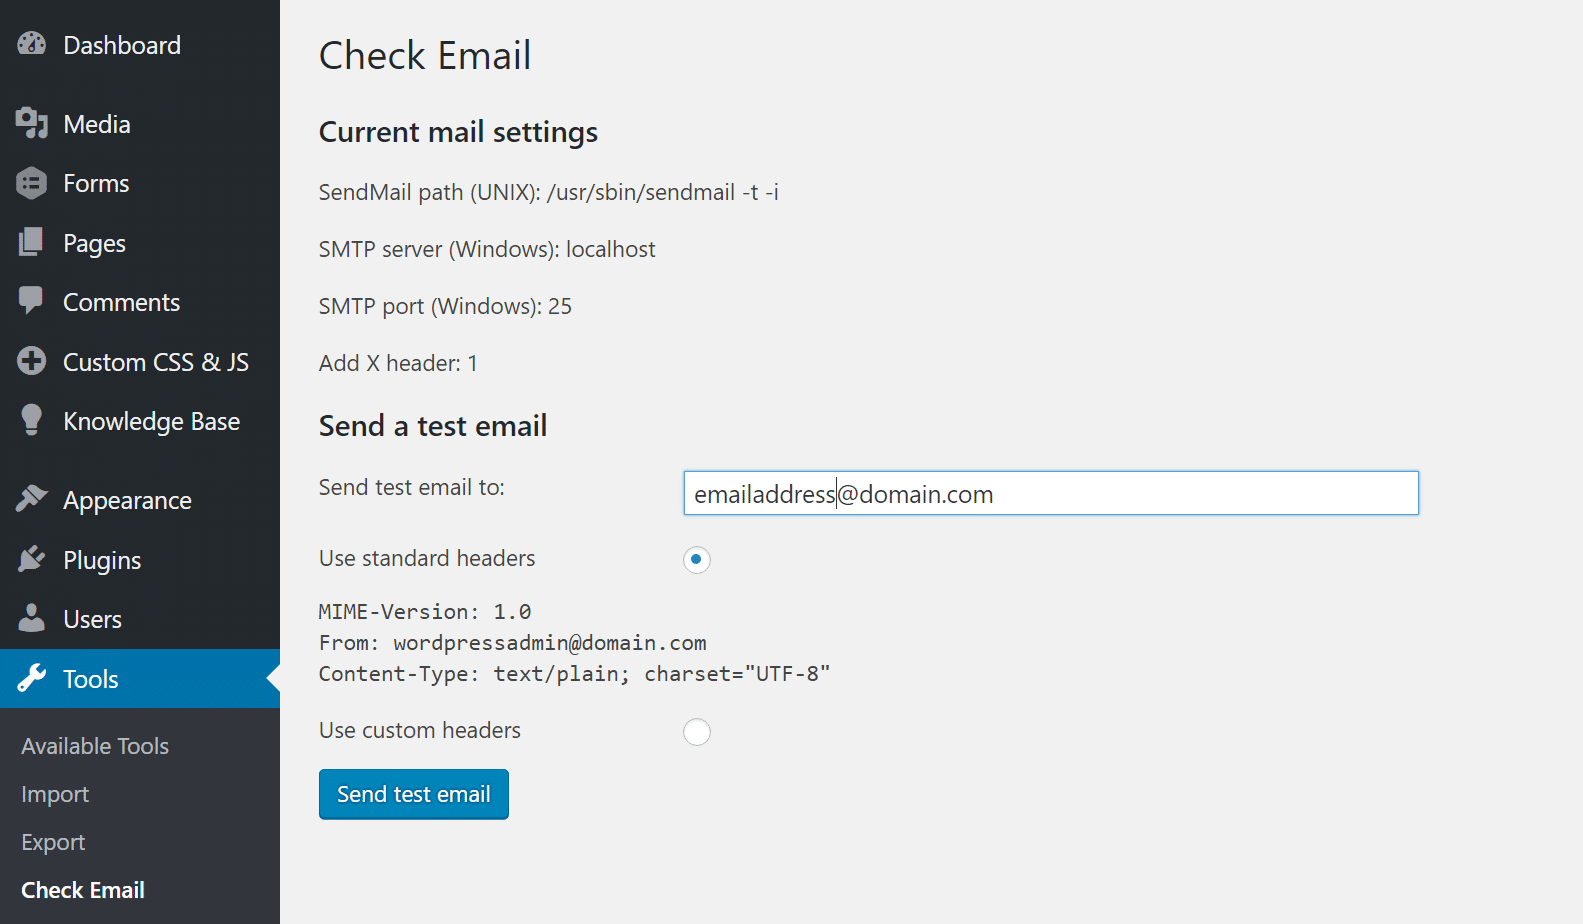
Test email on your WordPress site
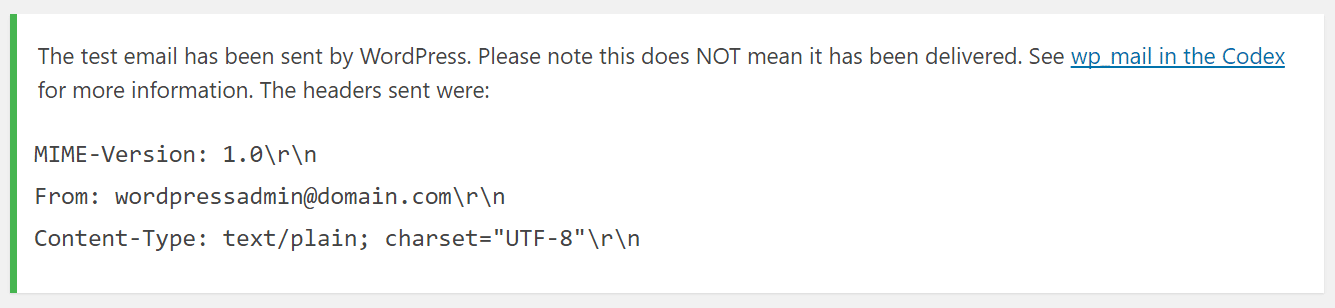
You will then see a confirmation.
How to Setup SMTP in WordPress
If the above recommendations didn’t work for you then the best solution is to set up WordPress with a third-party SMTP provider. Here are three options you can choose from and instructions on how to configure them:
- Option 1: Gmail (free up to 3,000 emails per month, increased limits if you pay for G Suite)
- Option 2: Mailgun (free up to 10,000 emails per month)
- Option 3: SendGrid
Here are a few additional SMTP/transactional email services you might also want to consider:
- SparkPost (free up to 100,000 emails per month)
- Mailjet (free up to 6,000 emails per month)
- Amazon SES
- SendWP ($9/month per site, very easy to setup)
Option 1: Configure Gmail SMTP in WordPress
You can utilize Gmail SMTP to send out emails in WordPress. A benefit to doing it this way is you can sometimes improve the deliverability of your emails and prevent more from hitting the spam or junk mail folder. However, it is important to note that in the free version they only allow you to send up to 100 emails every rolling 24-hour period. Or you could also look at it as 3,000 emails per month for free. However, you can increase these limits by paying for G Suite.
If you want a completely free SMTP provider with a large monthly limit we recommend checking out Mailgun. Follow the steps below to configure Gmail SMTP in WordPress.
Step 1
The first thing to do is download and install the free plugin called Post SMTP (previously Postman SMTP). As of writing this, the plugin has over 30,000 active installs with an impressive 5 out of 5-star rating and is actively maintained. It also works great with WooCommerce and Easy Digital Downloads.

Post SMTP WordPress plugin
In this example below, Gmail is being used as an SMTP server to send emails for the WordPress installation. We will be using the OAuth 2.0 protocol to authorize access to the Gmail API – which means a more secure login system and users won’t have to enter any username or password.
This plugin actually supports a lot of other setups and providers as well, such as Mandrill, SendGrid, and even MailGun. So even if you aren’t using Gmail, this can be a great plugin to hookup to your third-party SMTP provider.
Step 2
In the Post SMTP setup click on “Start the Wizard.”
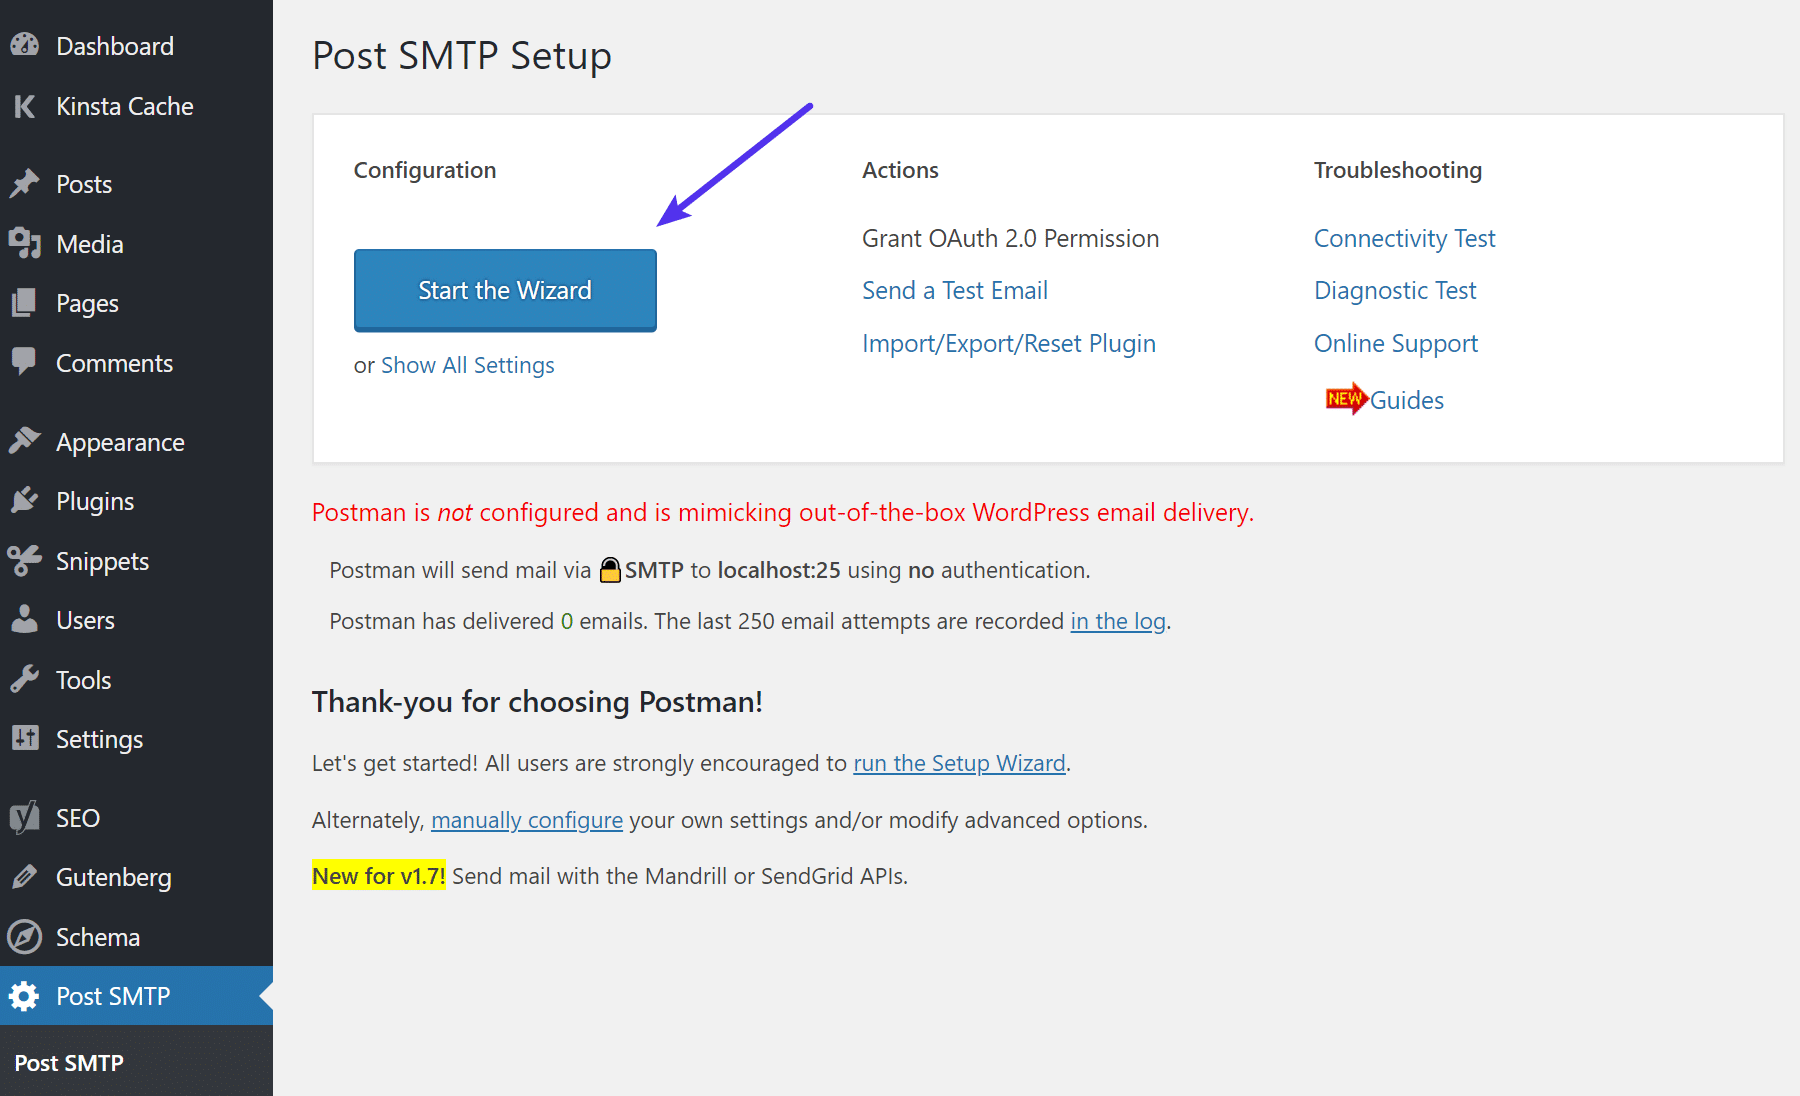
Post SMTP start wizard
Step 3
Input the email address you want to send mail as and your name. Note: Many email services will not let you send from an email address other than the one you authenticate with. Then click “Next.”
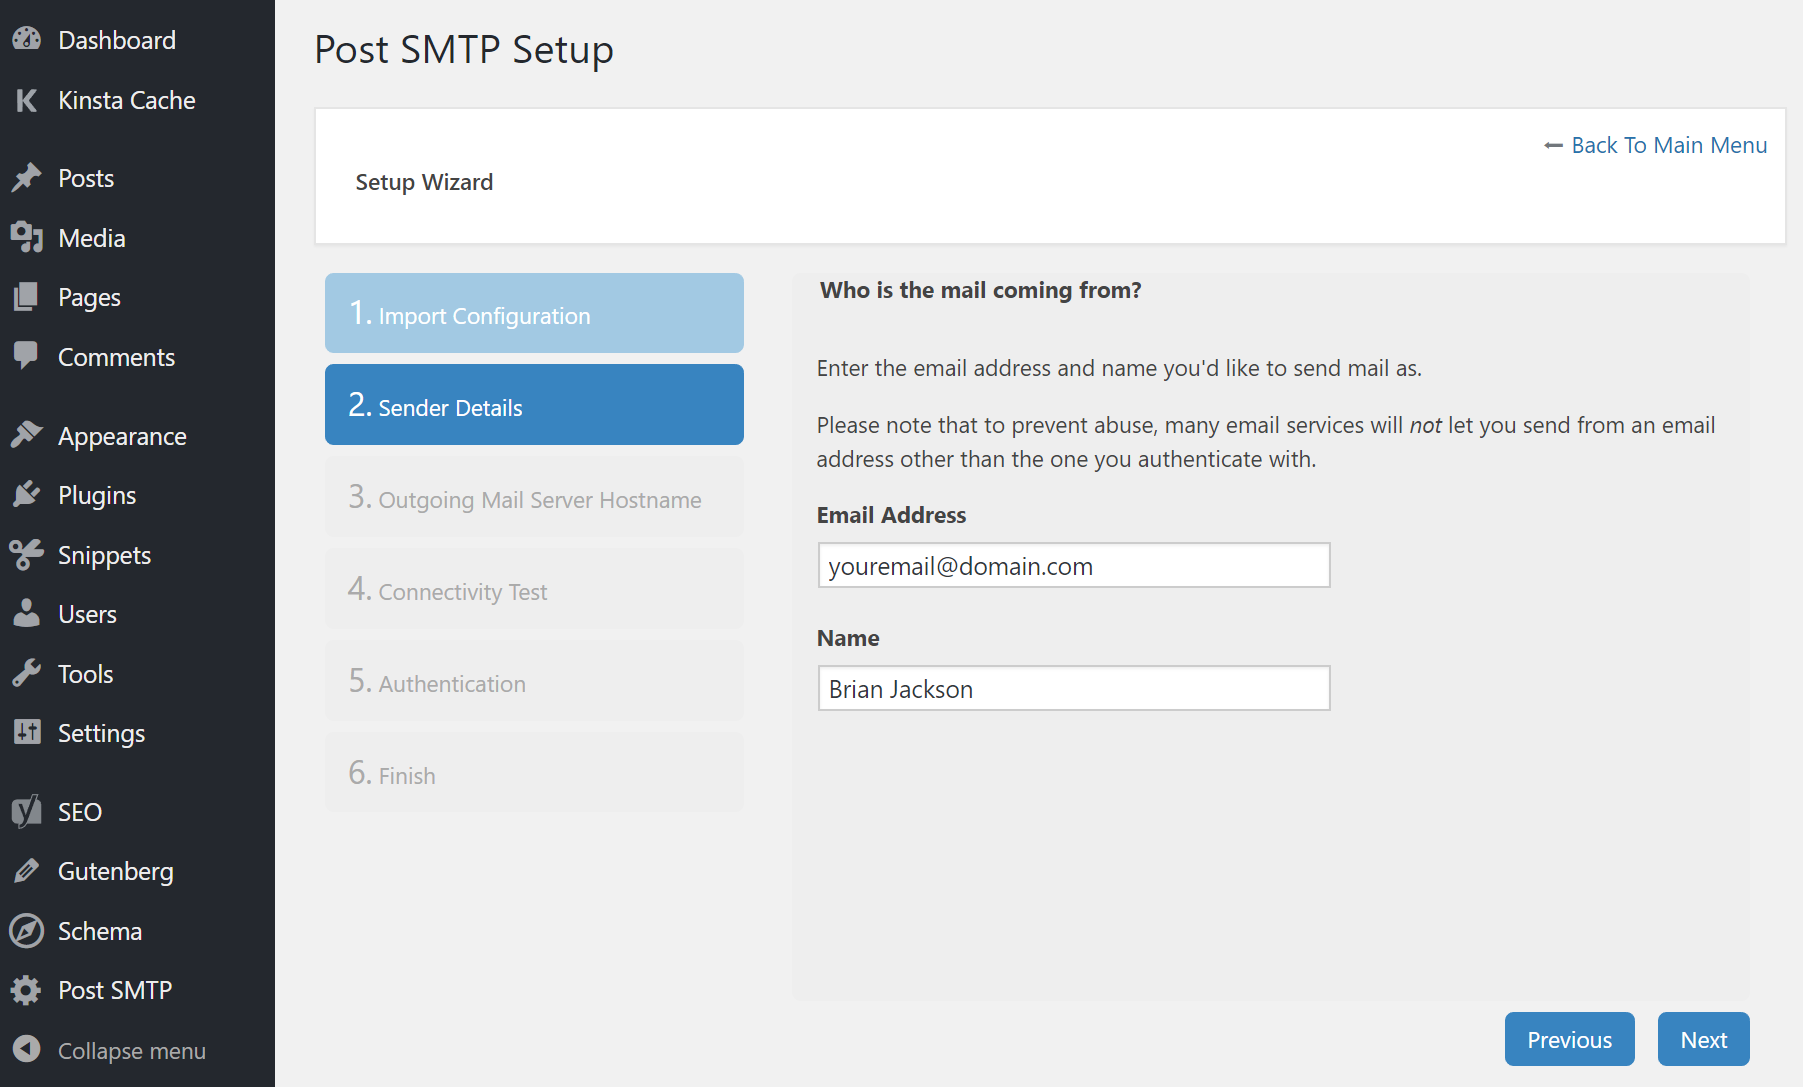
Post SMTP sender details
Step 4
On the next screen you will need to enter the outgoing mail server hostname. In this example, we are using smtp.gmail.com. Note: Some WordPress hosts require that you use their mail accounts with their mail servers, and prevent you from using others. In this case, you can ask your host for their outgoing address. Then click “Next.”

Post SMTP outgoing mail server hostname
Step 5
You will then need to configure how the connection to the mail server is established. We will be using the “Gmail API” in this example. Why? Because some hosts might be blocking the default ports. Use Google Cloud Platform which by default blocks outbound connections on port 25. Then click “Next.”
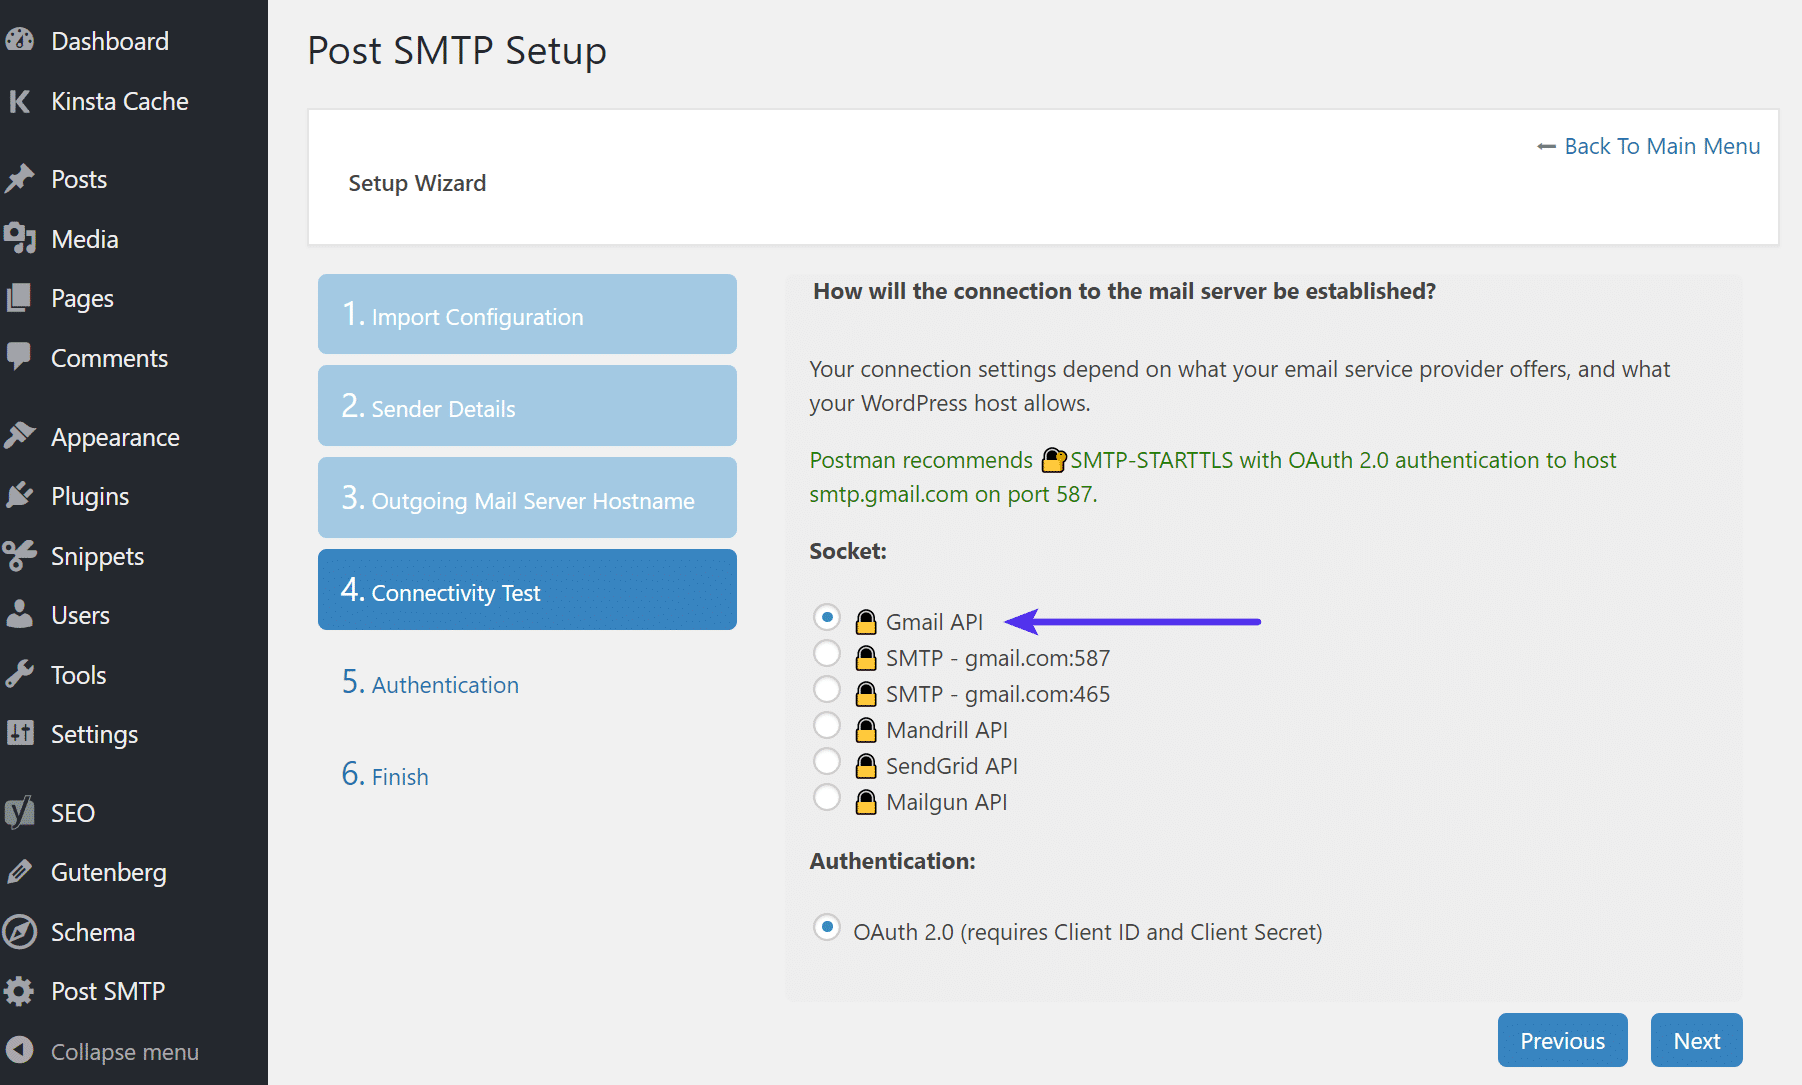
Post SMTP Gmail API
Step 6
You will then need to open up a new tab and create a new project with Google. Go to console.developers.google.com and log in with the Gmail you will be using to send emails. You will then need to create a new project.
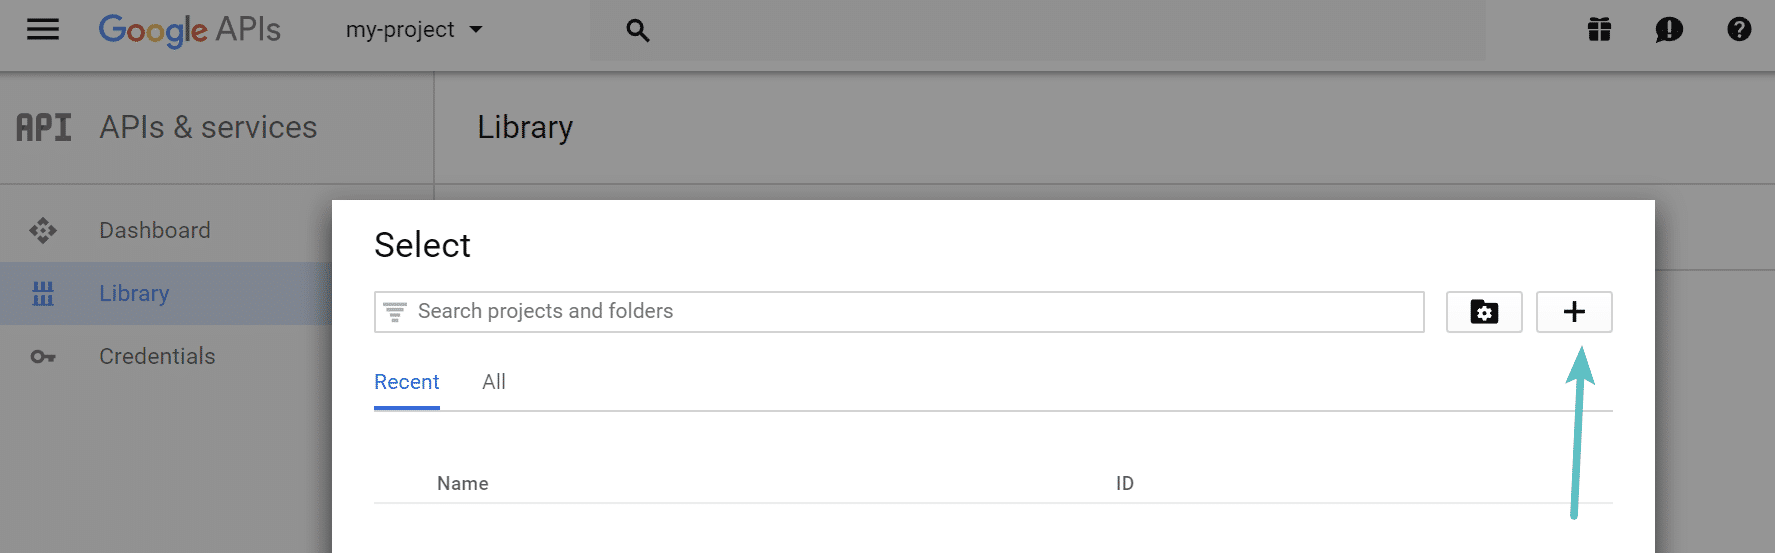
Google Developer Console – Create new project
Step 7
Give your project a name (you can choose anything) and click on “Create.”
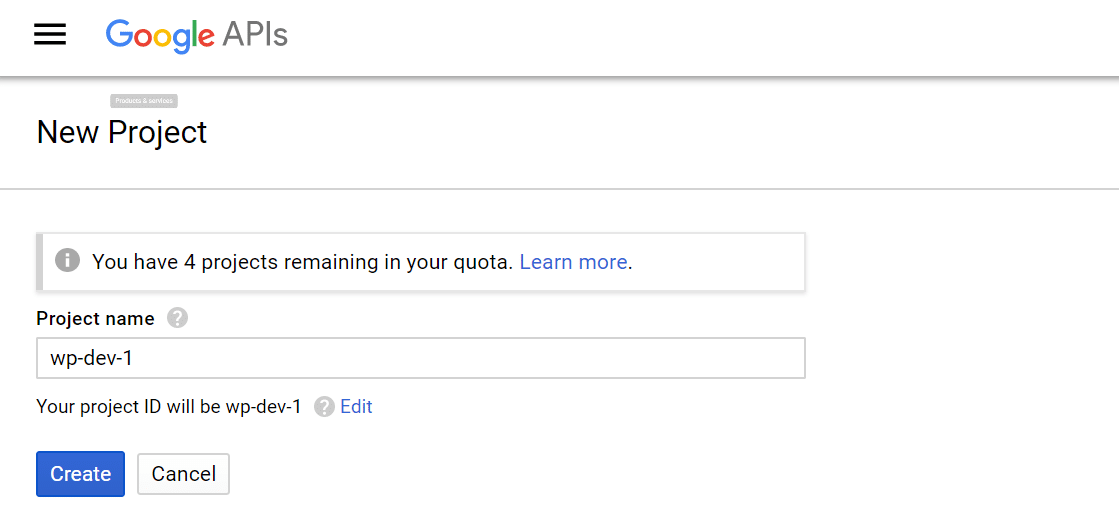
Name Google Project
Step 8
In the dashboard of the new project click on “Enable APIS and Services.”
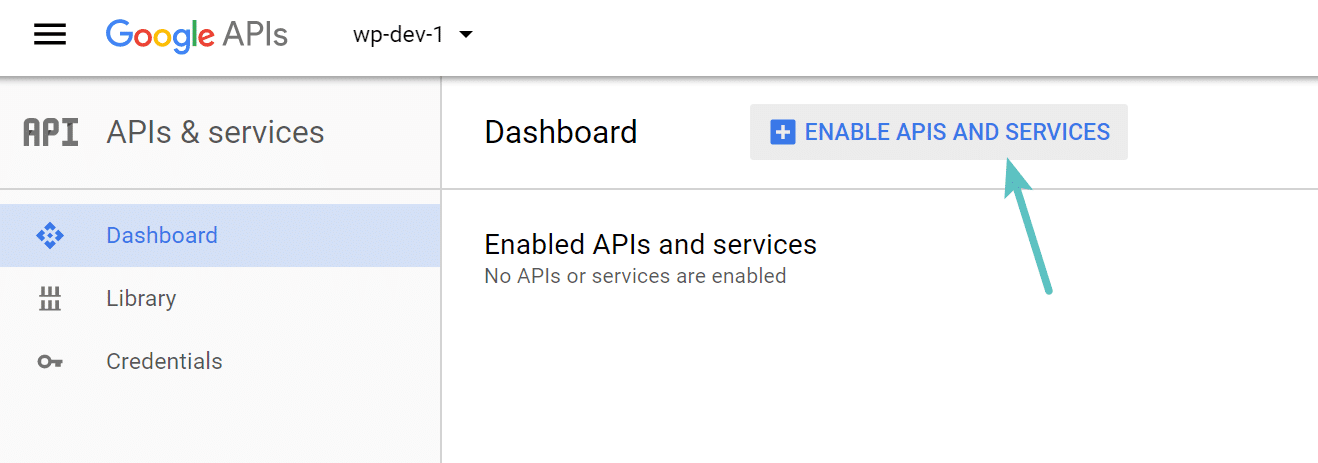
Google Project enable APIs
Step 9
Then click on “Gmail API” under G Suite APIs.
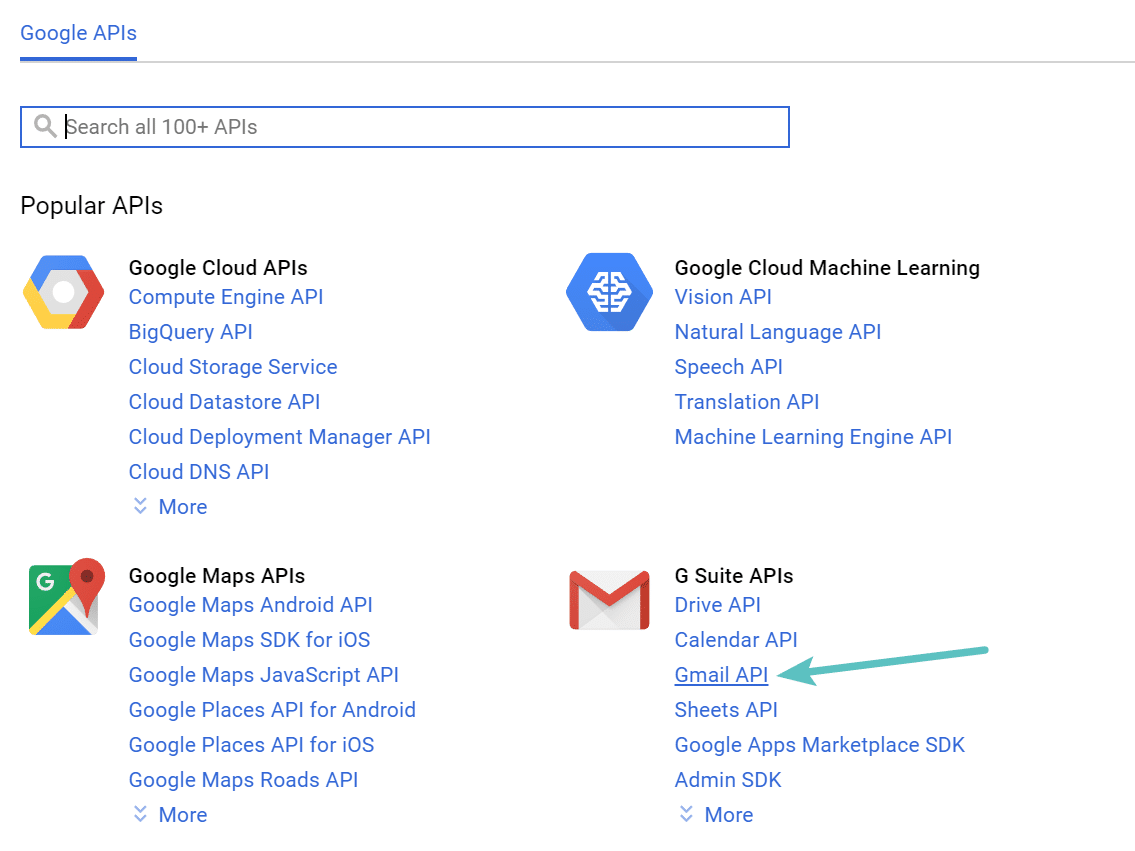
Gmail API
Step 10
Then click on “Enable.”
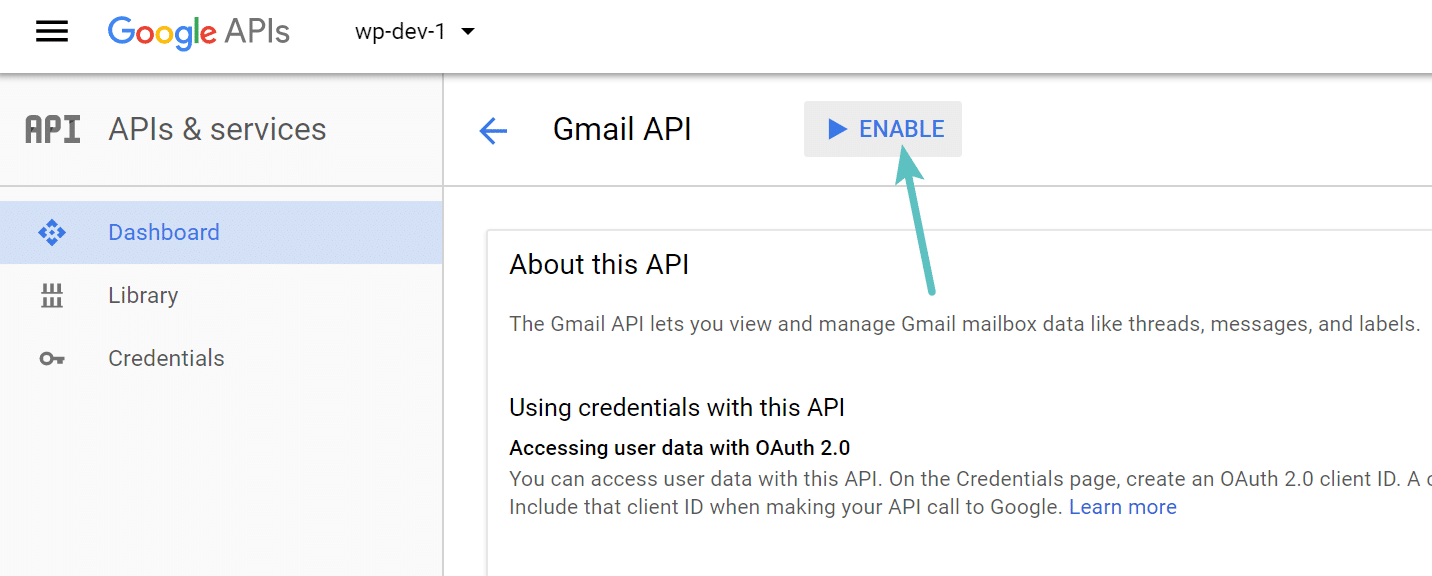
Enable Gmail API
Step 11
Then click on “Credentials” on the left-hand side. And then under Create credentials choose “OAuth client ID.”
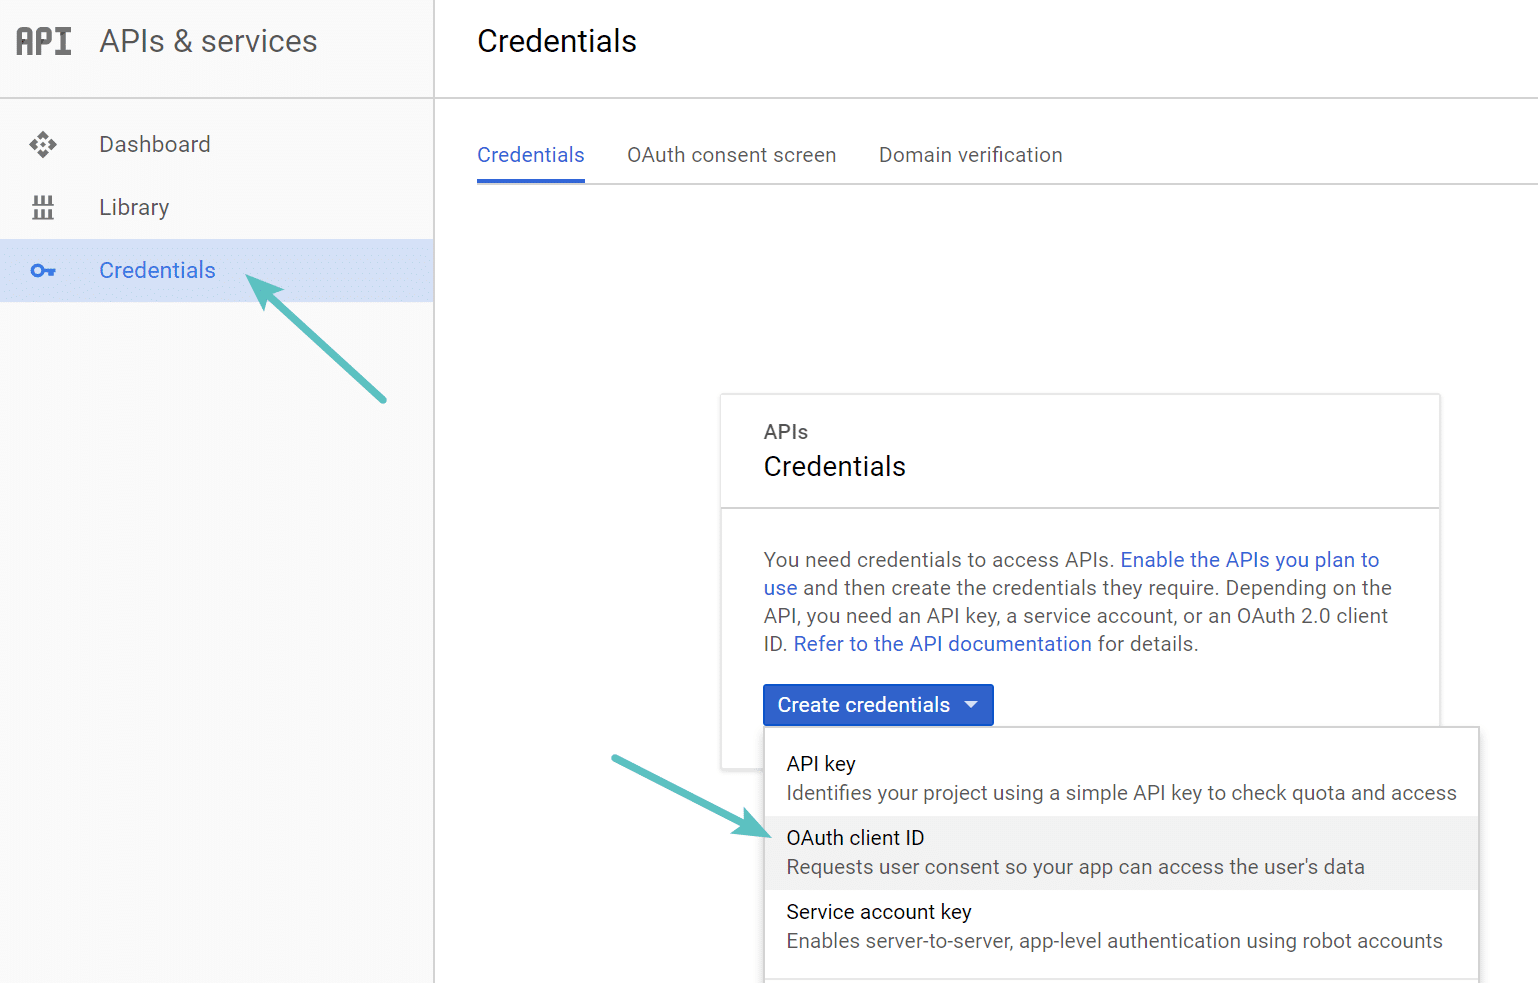
OAuth client ID
Step 12
On the next screen, you will need to click on “Configure consent screen.”
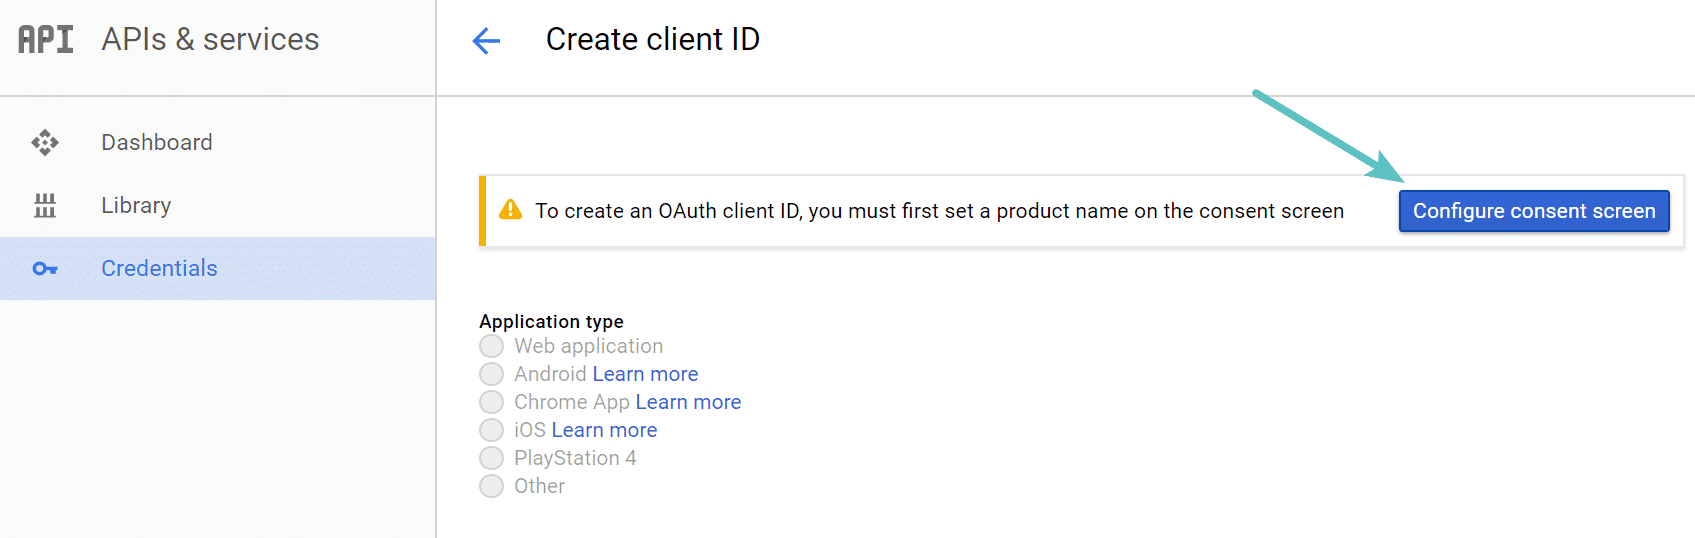
Configure consent screen
Step 13
Then input your email address, a product name (which can be anything), and at least a privacy policy URL. We recommend filling out everything. Note: A privacy policy is required for everything to be fully functional.
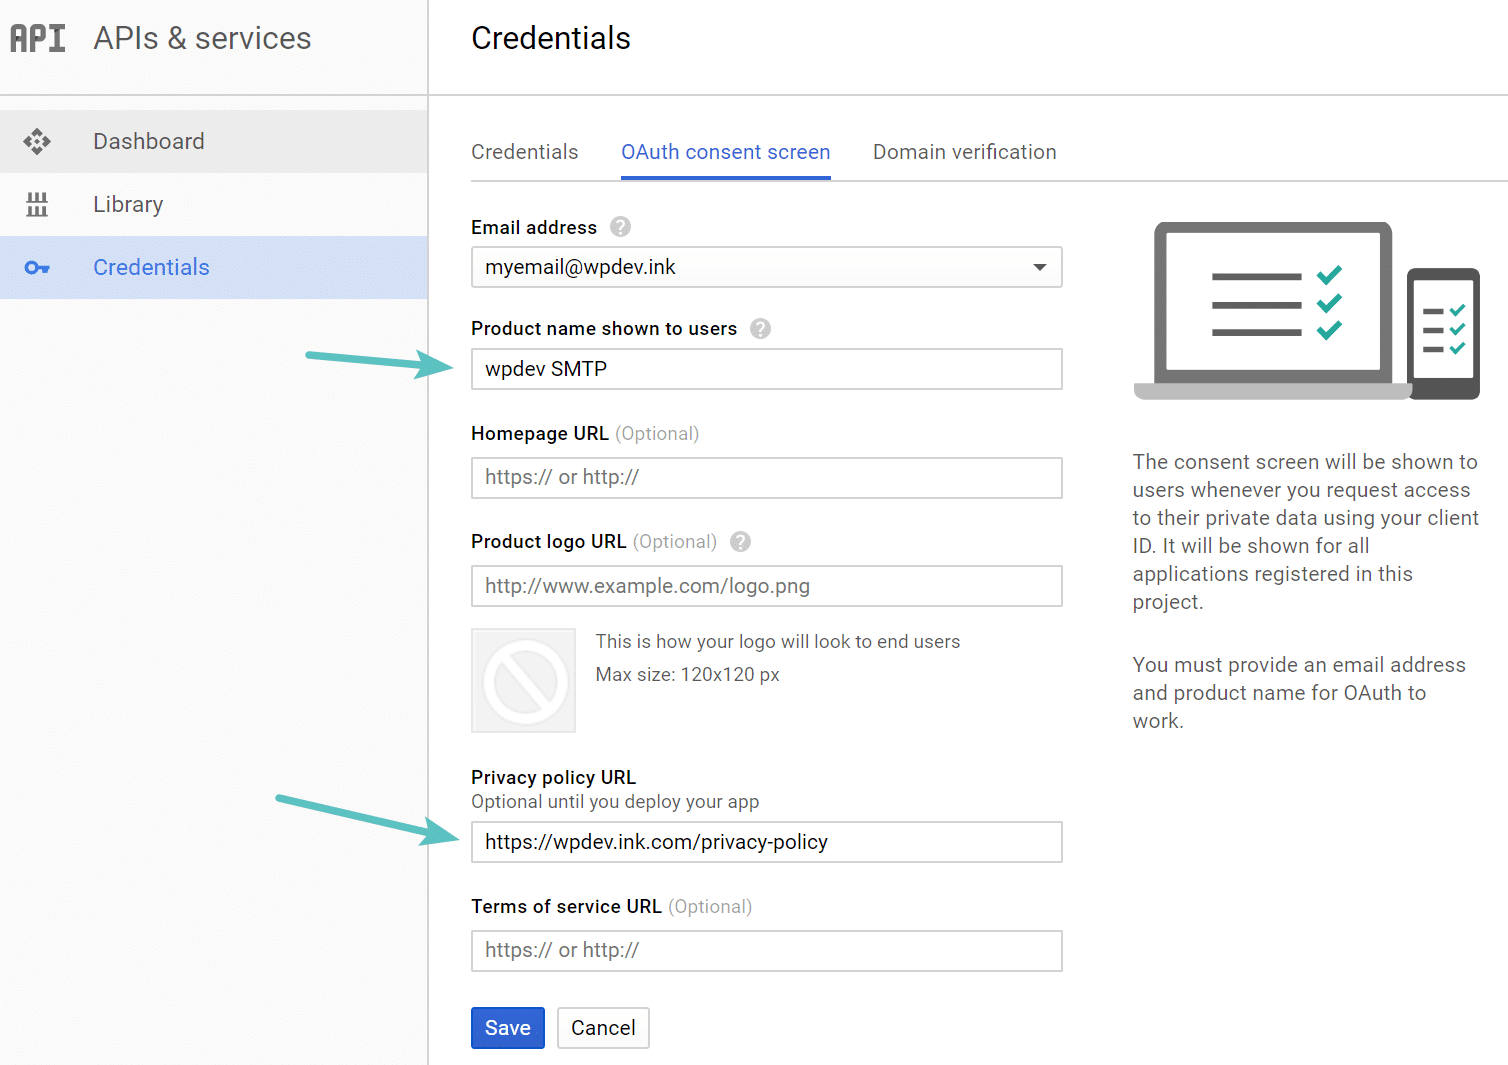
Oauth credentials
Step 14
On the next screen, it will prompt you for the application type, choose web application. Enter a name (which can be whatever you want). Then paste the “Authorized JavaScript origins” URL and the “Authorized redirect URIs” from the Postman wizard screen. Then click “Save.”

Client ID application type
Confused on where to find your Authorized JavaScript origins URL and Authorized redirect URIs? It is the top two in the wizard.
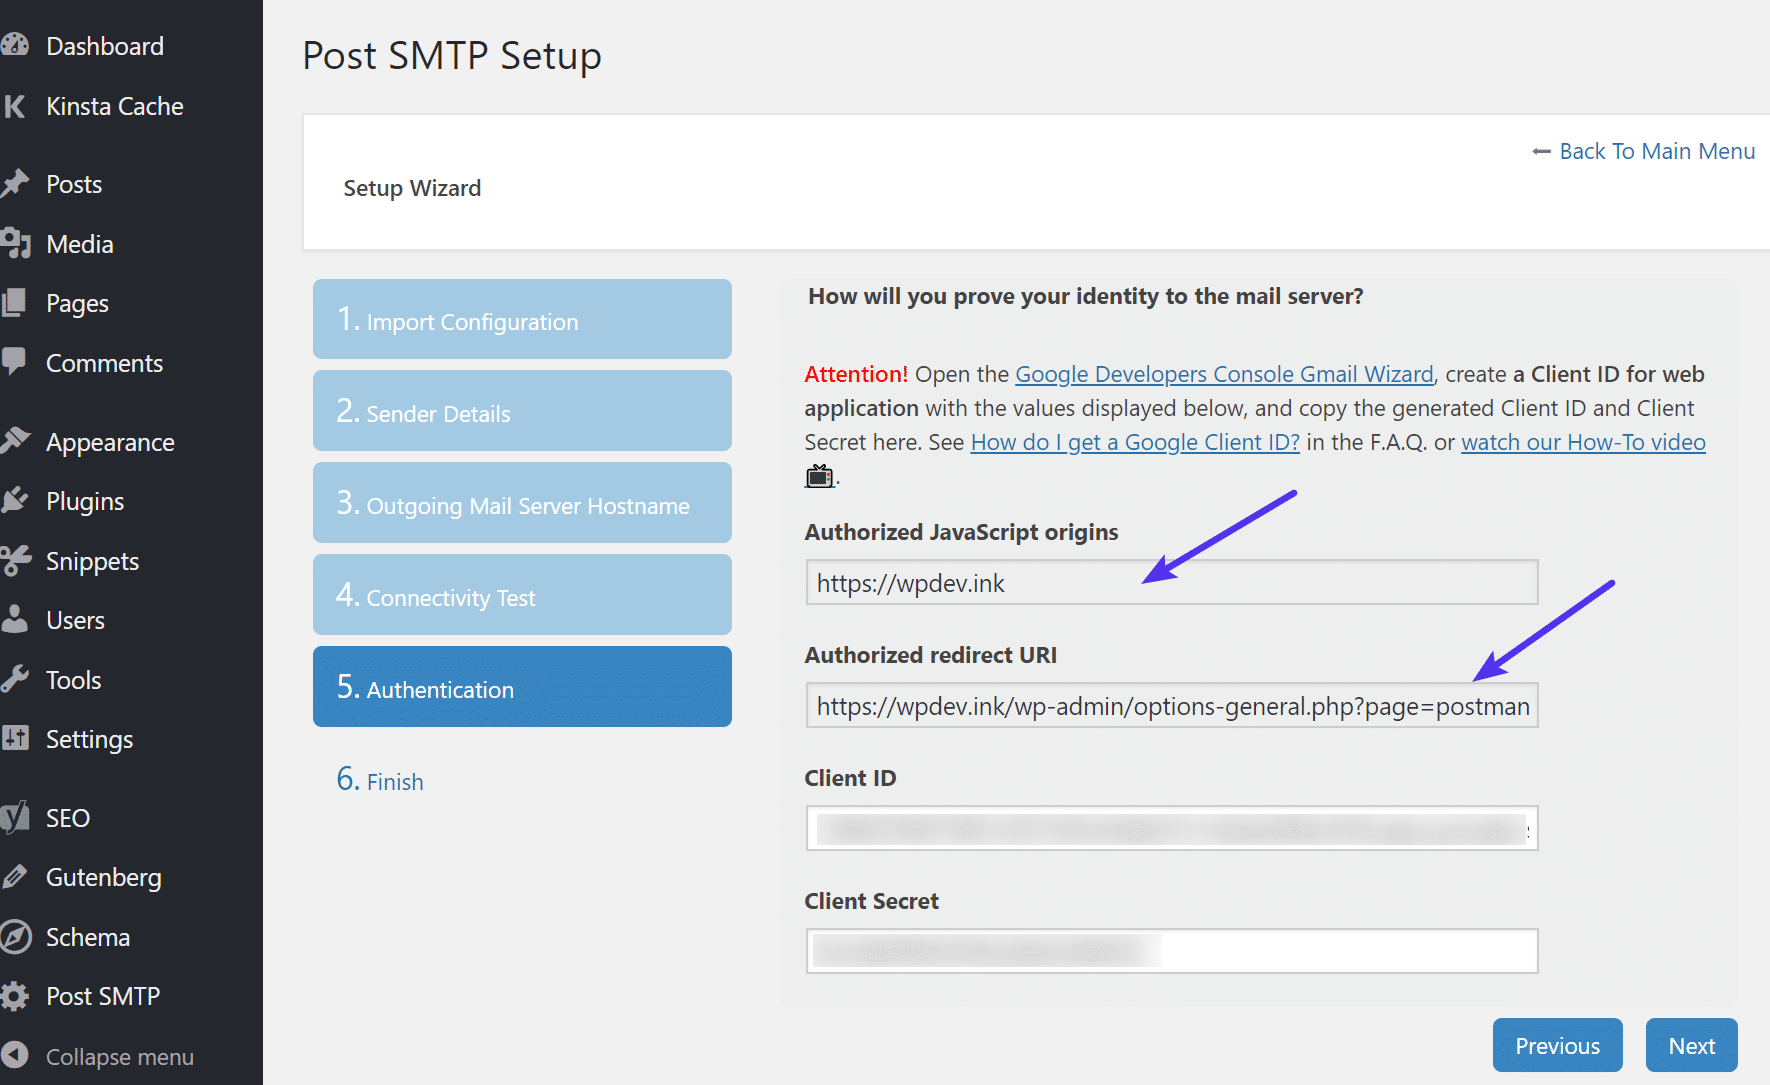
Authorized redirect URI
Step 15
On the next screen, you will get your client ID and client secret.
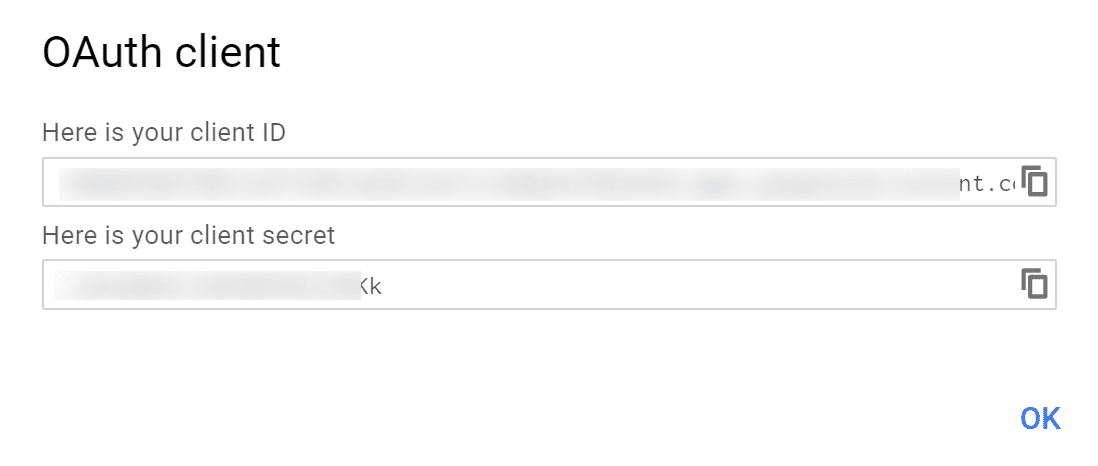
OAuth client id and secret
Step 16
Copy and paste these into the Client ID and Client Secret fields in the Post SMTP wizard. Then click “Next” and then “Finish.”
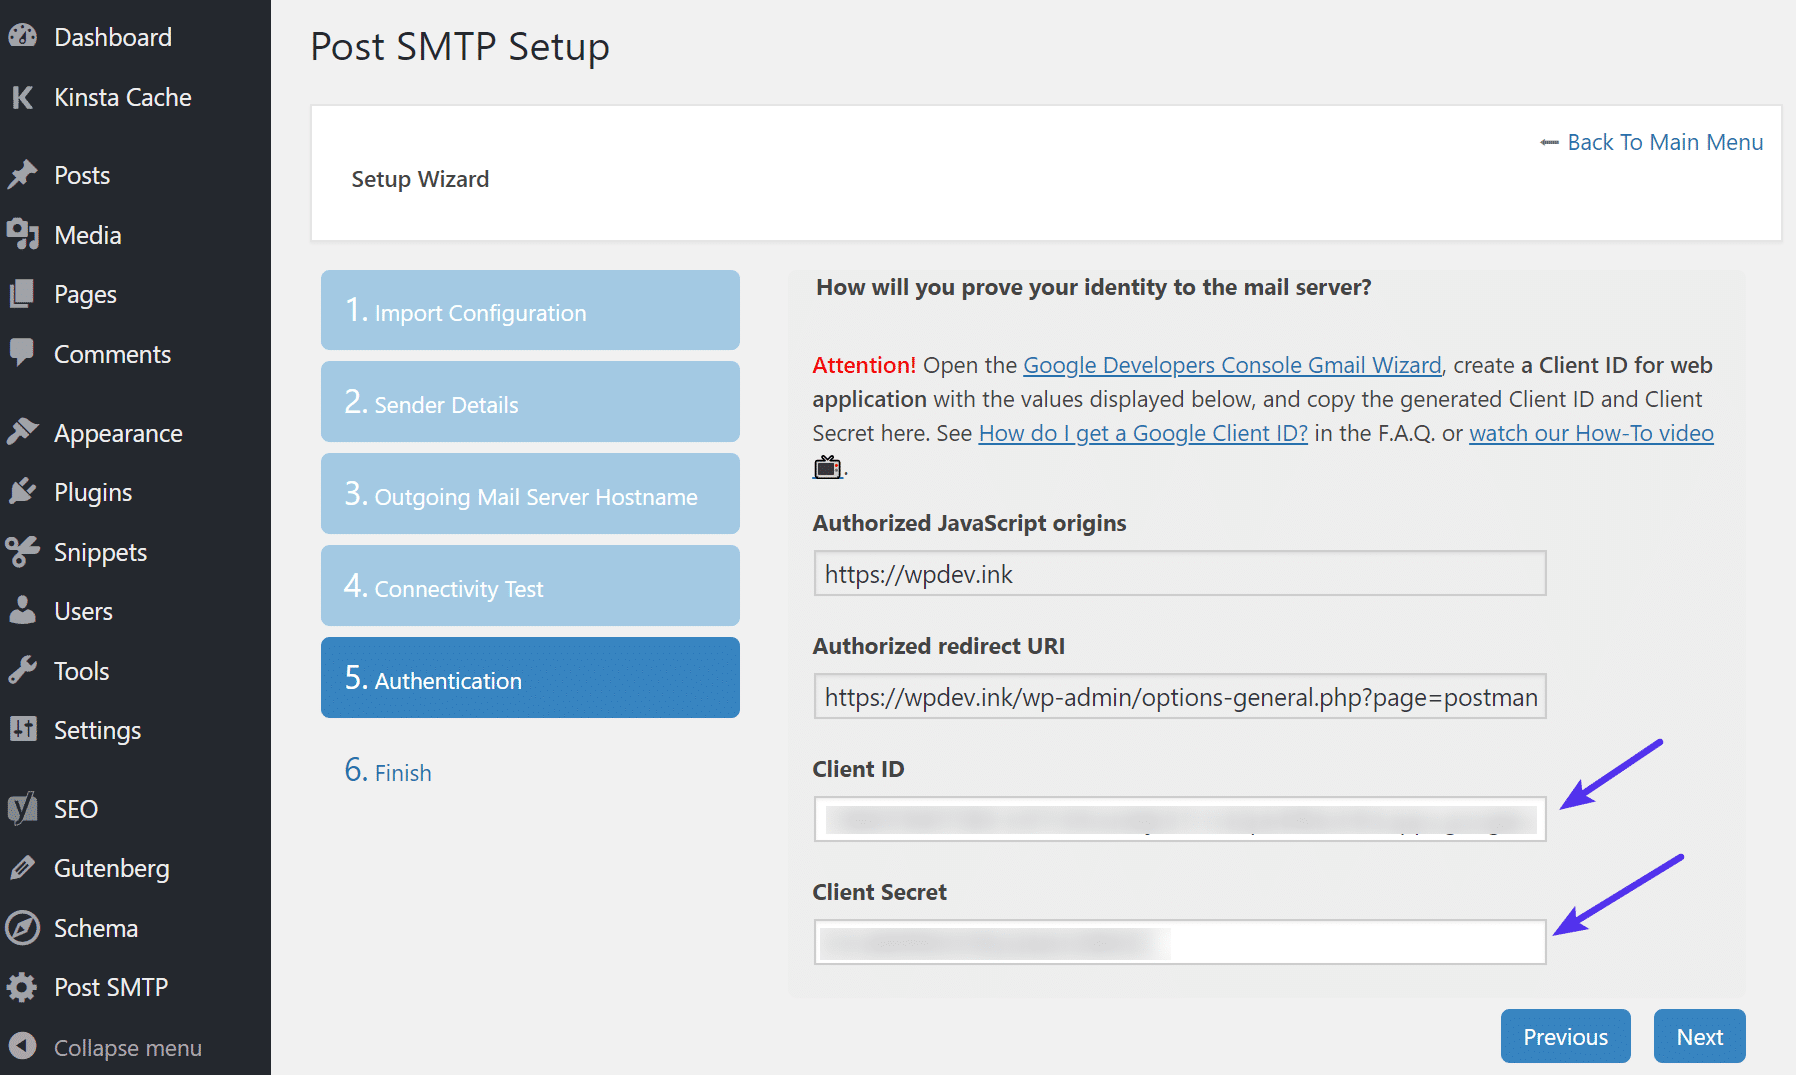
Post SMTP authentication
Step 17
Then back in the Google Developer Console, it is recommended that you add your domain so it is verified. Note: You should also have this setup in Google Search Console.
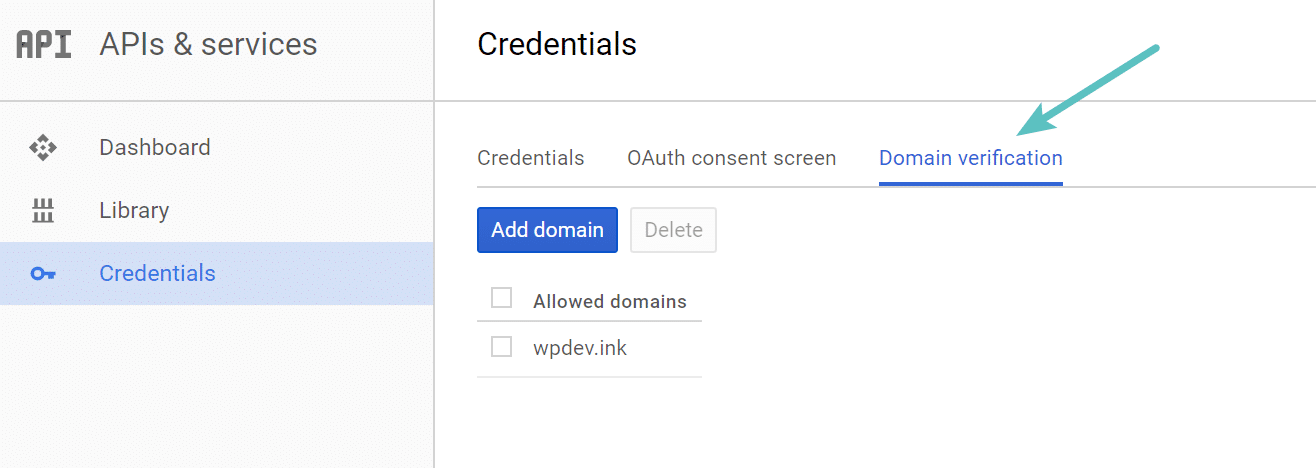
Verify domain in Google Developer Console
Step 18
You will then need to “Grant permission with Google” and click to allow your Gmail account access.

Post SMTP grant permission
Since you verified your domain you shouldn’t see this, but you might get the following error message as Google has recently enhanced their risk assessment for new web applications that request user data. Based on this risk assessment, some web applications will require a manual review before users can approve data permissions. Until the review is complete, unverified apps will display an “invalid_scope” or some other random error messages when you go to the permissions consent page.
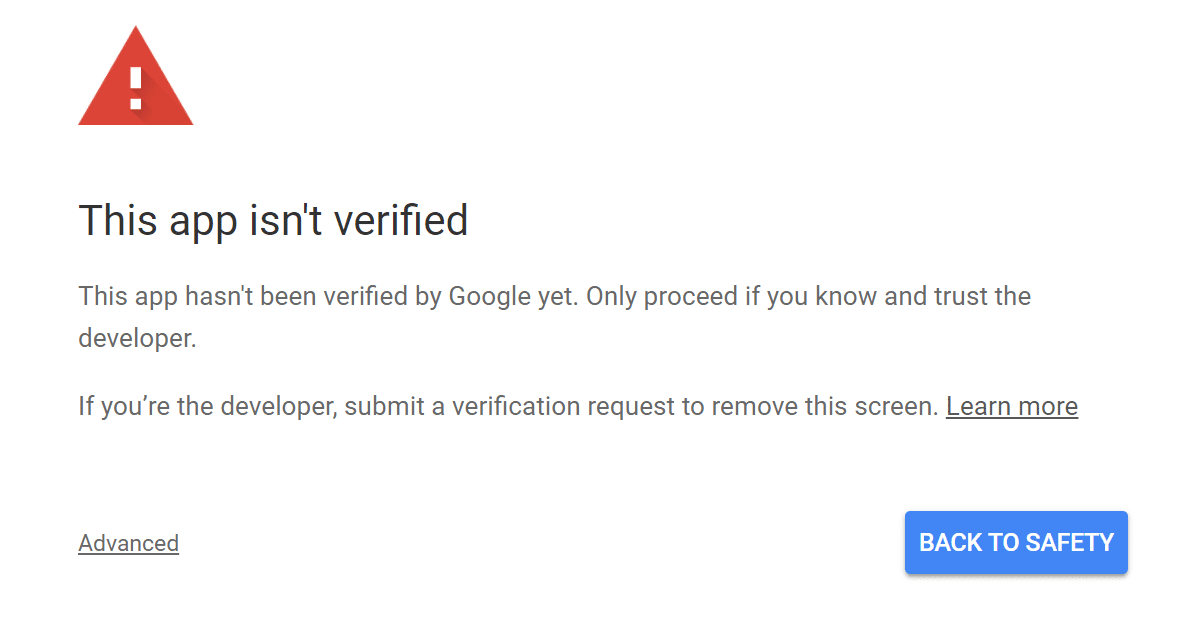
This app isn’t verified
You can click on “Advanced” and proceed anyway but should fill out this developer application to get approved long-term. You should then see an “Access Granted Successfully” message and the SMTP status will show connected.
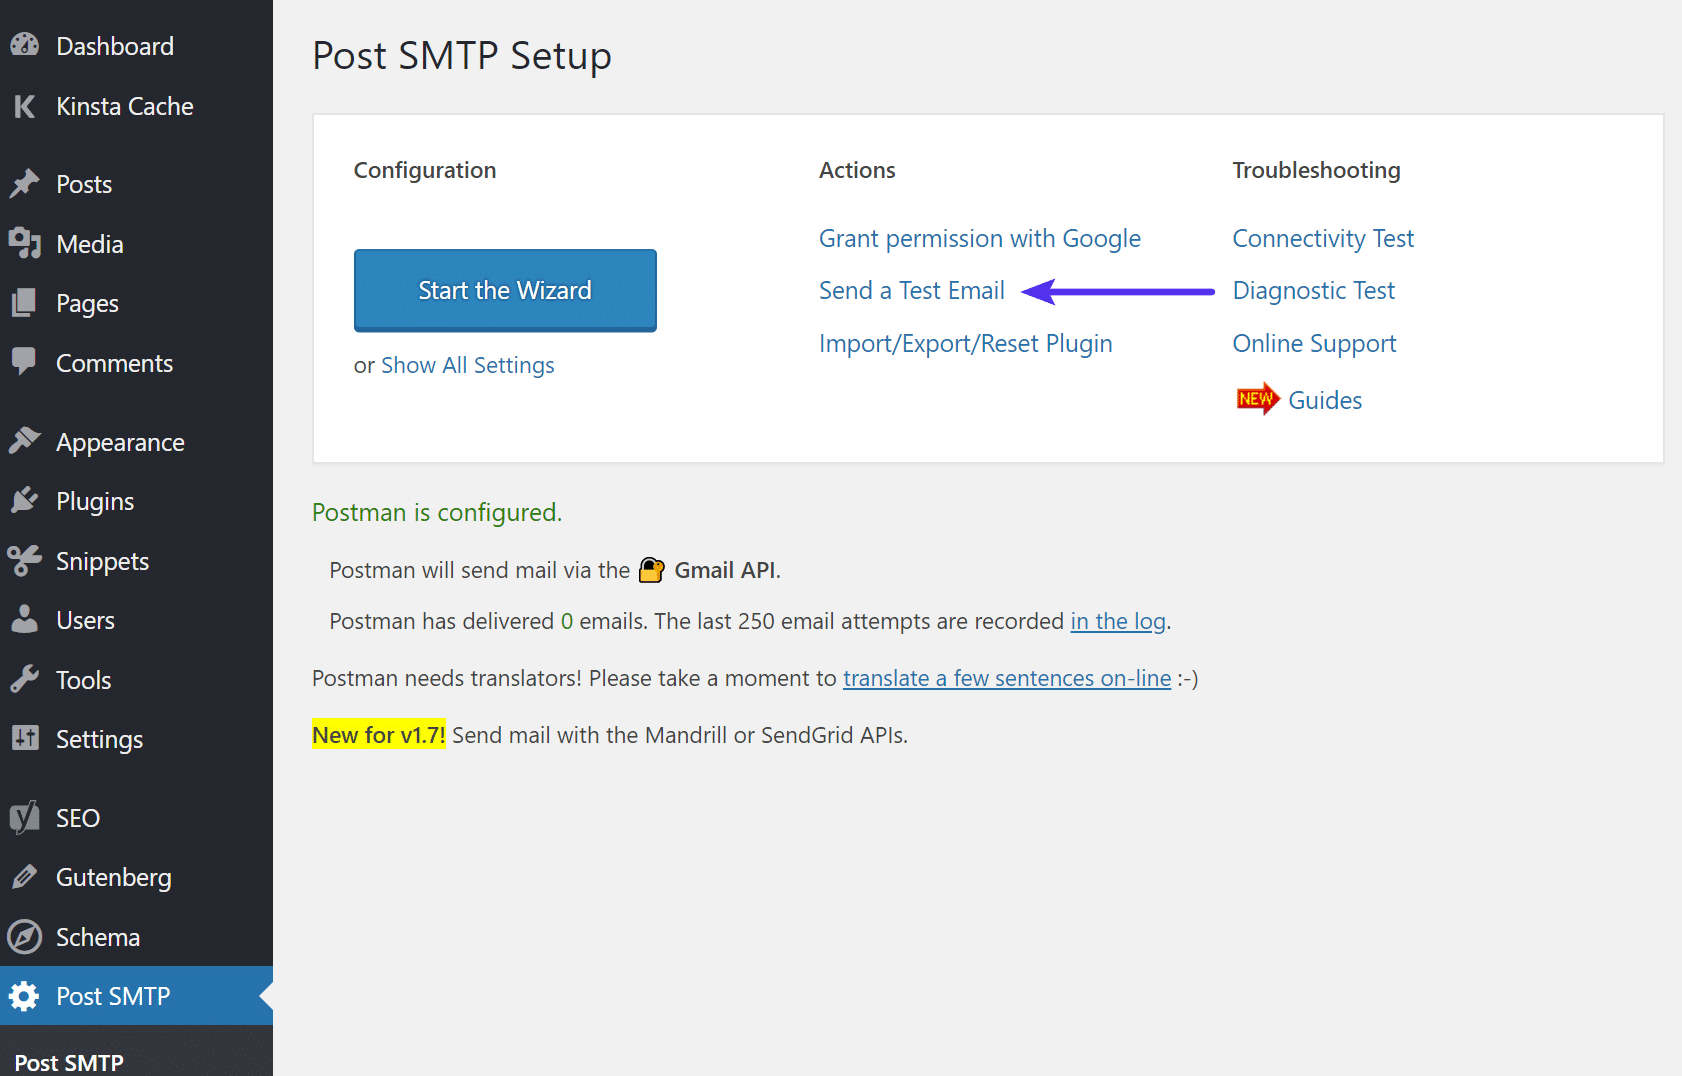
Sending a Test Email
You can then send a test email to verify everything is working correctly.
Post SMTP send test email
If everything works fine you should receive an email that looks like the following below.
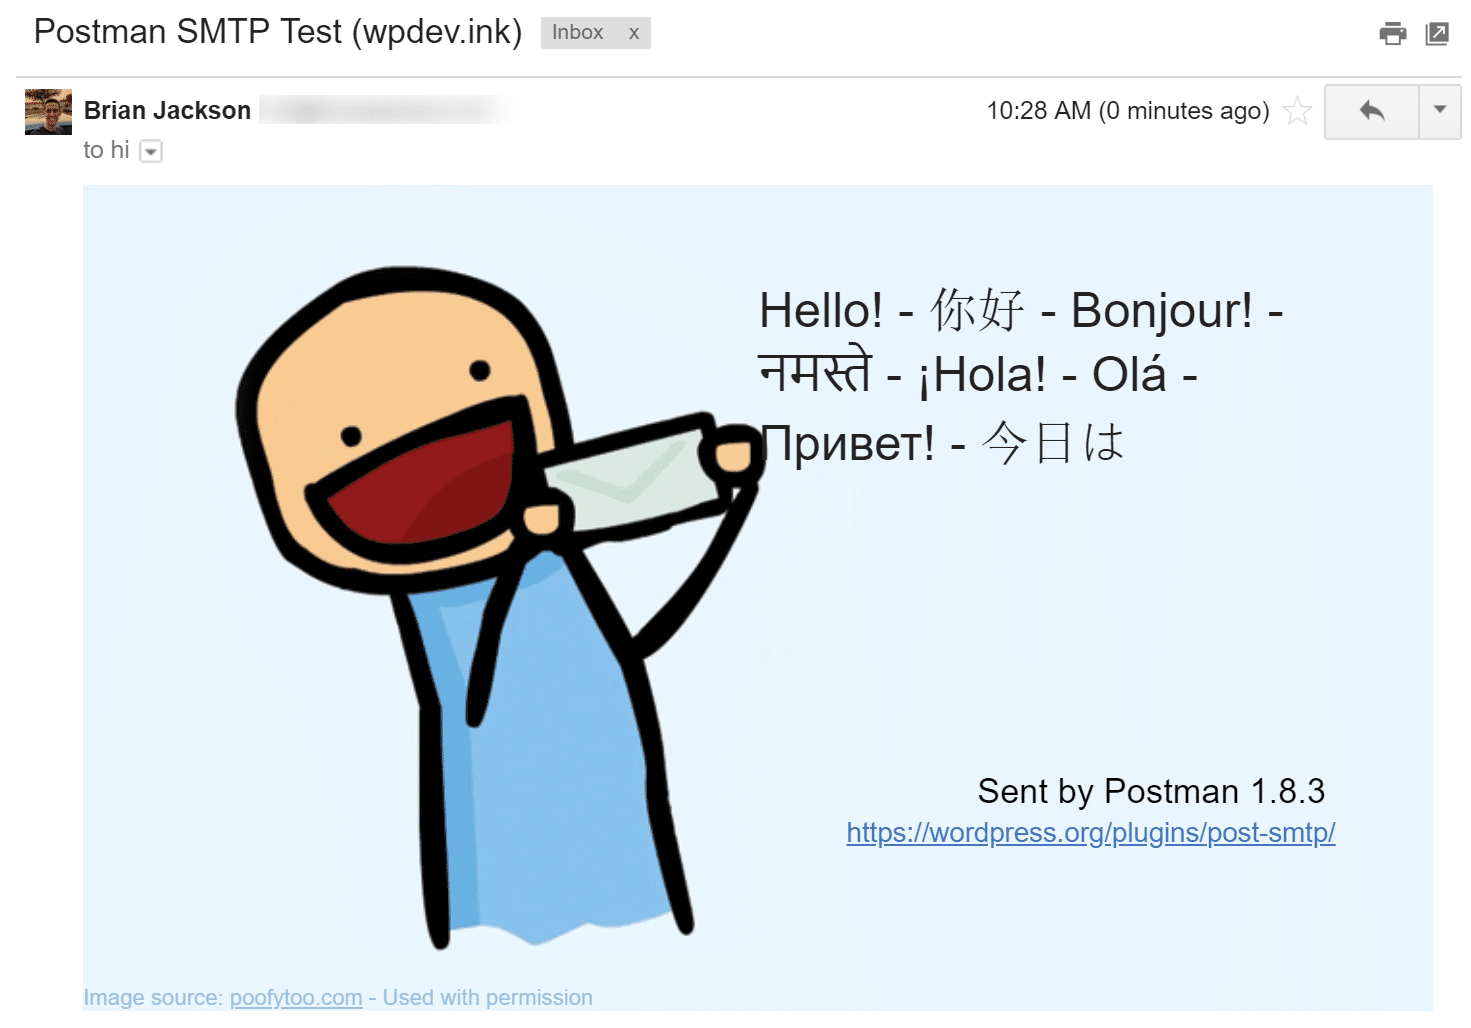
Successful test email
Option 2: Configure MailGun SMTP in WordPress
Mailgun is a transactional email API service designed primarily for developers. However, even non-developers can easily implement their service. We’ll show you below just how easy it is! One of the huge benefits of Mailgun is that they allow you to send up to 10,000 emails for free per month. The next 500,000 are billed at $0.00050 based on usage, which is cheap. For a lot of small businesses or WordPress developers, 10,000 emails might be more than you need.

Mailgun WordPress plugin
Check out our in-depth tutorial on how to configure Mailgun in WordPress.
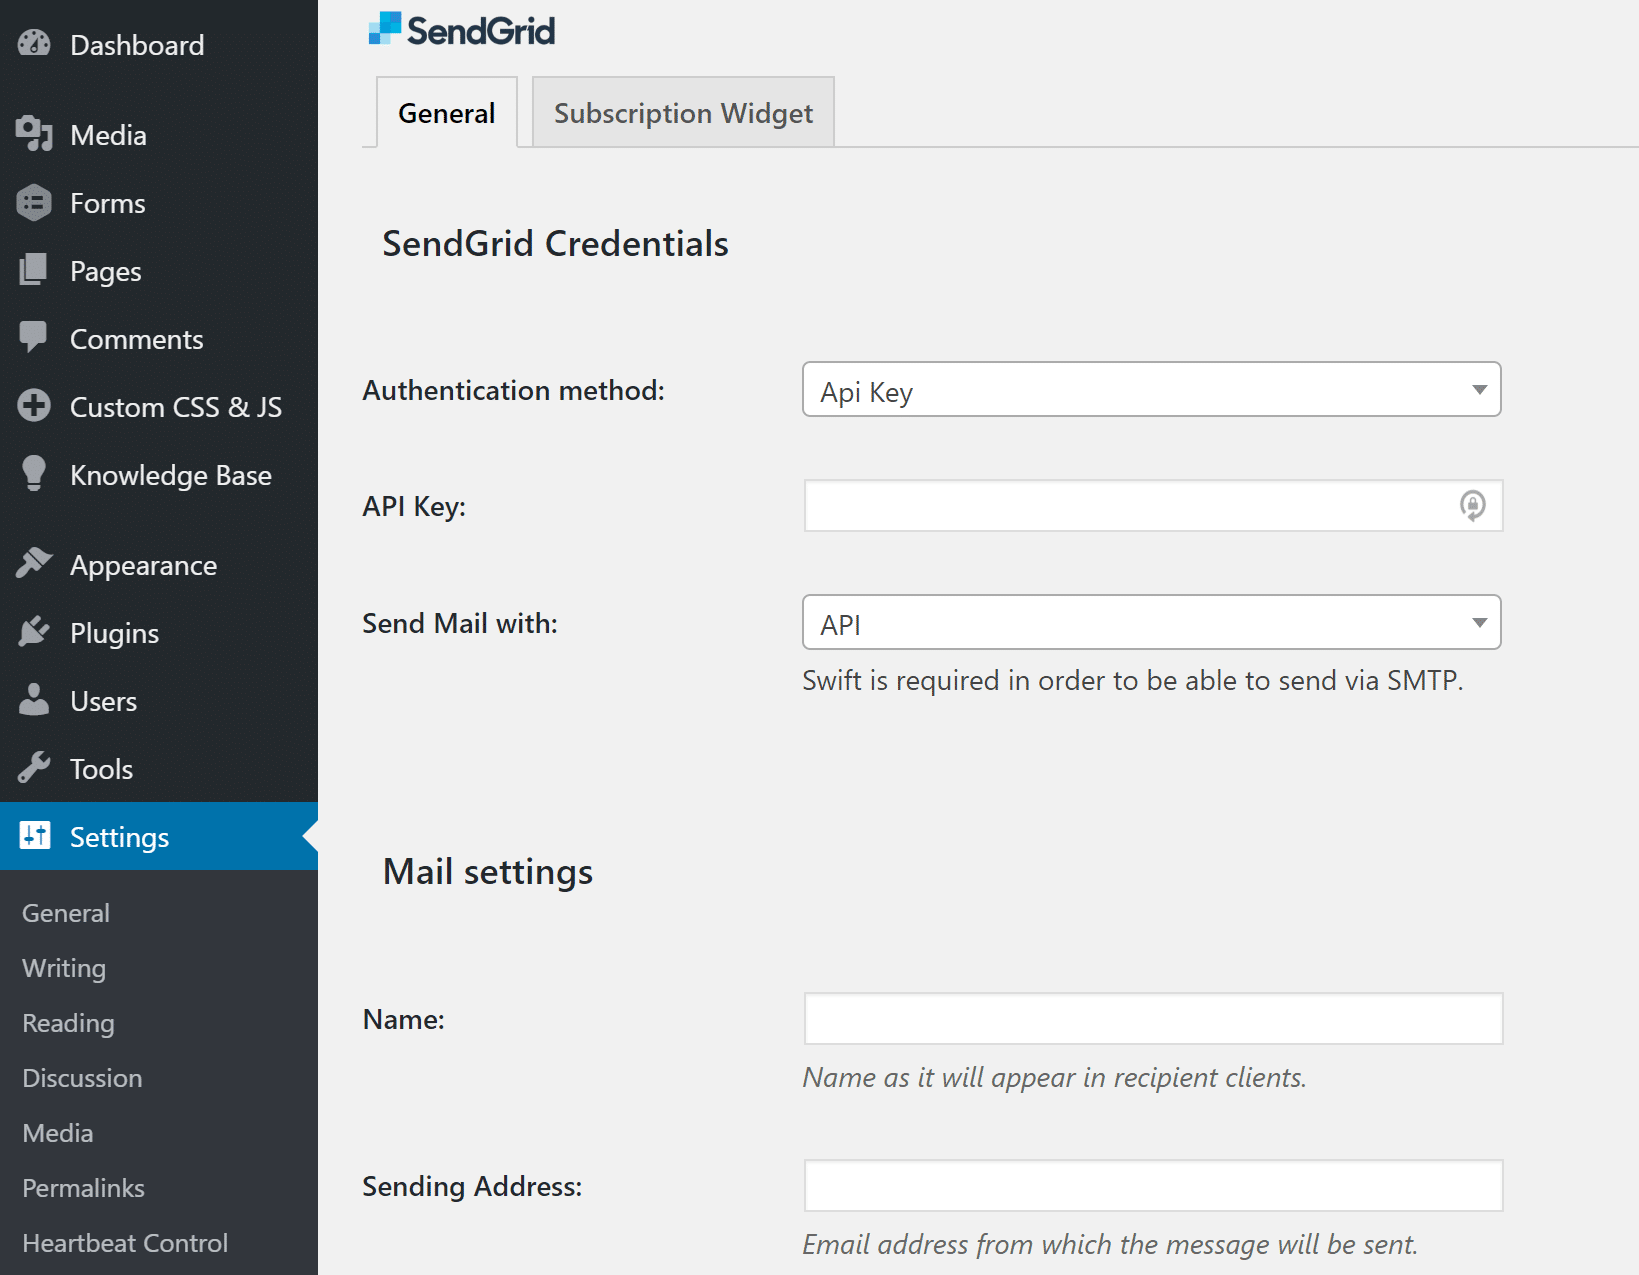
Option 3: Configure SendGrid SMTP in WordPress
Another great alternative is SendGrid. They have a free trial, which allows up to 40,000 emails in the first 30 days. You can download their free WordPress plugin from the WordPress repository. As of writing this, the plugin has over 80,000 active installs with a 4.5 out of 5-star rating. The plugin replaces WordPress’s default wp_mail() function by using either an SMTP or API integration.

Sendgrid WordPress plugin
SendGrid has a long history of providing great email deliverability and secure mail for big brands such as Airbnb, Spotify, and Uber. We even use SendGrid ourselves here at MB Shine for all transactional emails. Once you install the plugin, simply click into it under your WordPress dashboard settings and configure it with your API key. See SendGrid’s API documentation.
For more details and step by step instructions take a look at this guide: How to Configure SendGrid in WordPress to Send Emails


